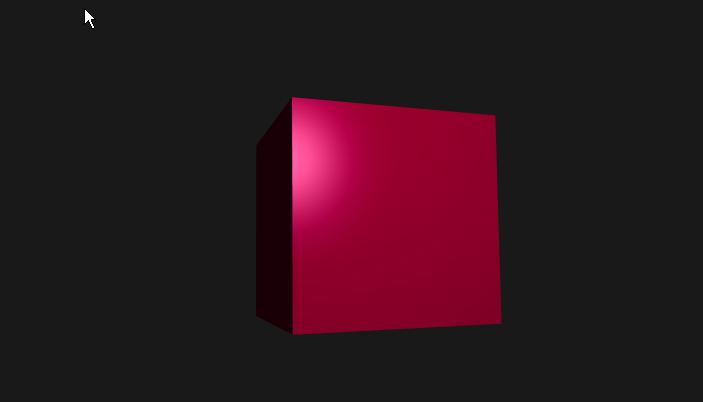
Chapter 48 of the offline book that can be downloaded from LearnOpenGl.com is about text. The C++ program accompanying the book uses the FreeType library to produce bitmaps and metrics for letters. When using programs in the html context many other options are available. We use a program that displays a cube, a program similar to the one of Chapter 14. The output without text is:
We might be interested in
So, there is much variation in the use of text in programs. First we look at techniques that do not model the text itself. After that we will use text that is really modelled as a 3d object.
##3 Html, overlays and css (1) In css we can overlap one element by another. We start by using a div as a container for boyh the canvas in our program and another div with the text we want to display. We set the position of the container div and then we set the position of the overlay as absolute:
<body>
<div class="container" id="container1">
  <canvas id="canvas"></canvas>
  <div class="overlay" id="text1">
    our text
  </div>
</div>
</body>

and in a css style file:

.container {
    position: relative;
}
.overlay {
    position: absolute;
    left: 10px;
    top: 10px;
}
The absolute value of (10px, 10px) is relative to the last element on which the position is set, so relative to the container. We fill the content of the canvas in our program and the text is shown in the left-upper corner. The way the div with text is displayed can of course be influenced as well in css, for instance the background color or the color of the text. And we can set the text itself of course in our program if that is what we need.
In the file html_css1.html we have put the css styles and in the html_css1.ts program we fill the canvas. The output shows the text "our text: a cube!" over the canvas with the cube.
We want to place text next to corners of our cube. This can be done by setting css properties at runtime. In our html we now have only the container element. Runtime the canvas and the text-div will be created. And runtime we will calculate a value for the css properties left and top.
In our program we start with creating divs for the text elements. In the front-side of the cube we have divA, divB, divC and divD, filled with the letters A, B, C and D.
The letter A is created as follows:
function createTextDiv(txt){
    // create a text-div with the css class 'overlay'
    var div = document.createElement("div");
    div.className = "overlay";

    // fill div with text
    var textNode = document.createTextNode(txt);
    div.appendChild(textNode);
    return div;
}
And this letter is added to the container with let divA=createTextDiv("A"); containerElement.appendChild(divA);
We want the A and D a little bit to the left and the letters B and C a little bit to the right of the front side. Our cube is a cube between (-0.5, -0.5, -0.5) to (0.5, 0.5, 0.5). For the A at the top-left of the cube we choose as coordinates (-0.6, 0.5, 0.5, 1.0) and similar coordinates for the other letters. Now, these coordinates have to be translated to px values. This is done by transforming the point coordinates to clip space by multiplying the coordinates of the point by the ModelViewProjection matrix first and then transforming to screen space using the viewport width and height:
function WorldToPx(textDiv, point: vec4, MVPmatrix: mat4, canvas) {
    // compute clip space position of point
    let clipspace = vec4.create();
    vec4.transformMat4(clipspace, point, MVPmatrix);

    // divide X and Y by W
    clipspace[0] /= clipspace[3];
    clipspace[1] /= clipspace[3];

    // convert from clipspace to pixels
    let px = vec2.fromValues(
        (clipspace[0] * 0.5 + 0.5) * gl.canvas.width,
        (clipspace[1] * -0.5 + 0.5) * gl.canvas.height
    );
    // set position of text-div
    textDiv.style.left = Math.floor(px[0]) + "px";
    textDiv.style.top = Math.floor(px[1]) + "px";
}
Only the left and top style values are computed in code. The other style fields can still be set in the html code, e.g. the font-size and the text color. This techique can of course also be used for a moving cube. The name of the program is html_css2.ts.
In the same way as using an overlay with a <div> we can use an overlay with a second <canvas>. In that second canvas we can use the 2d interface that does support text rendering. Not only does it support text it does support 2d drawing as well (lines, curves, ellipses ...). Let us give this second canvas the id="canvasOverlay" in the html code.
In our program we fisrt get the 2d interface by calling
In the render() function we then first clear the canvas and then write some text on it
Again we have to calculate the pixelX and pixelY values in hte same way as in the previous program. The name of this program is overlay_2d.ts. In the render() of the program we adjust to pixelX values with dwChar, the width of the letter "B", and we use the text alignment center.
Instead of projecting text on the screen, sometimes it is nice to put out text on the faces of our cube. This can be done by first drawing the text on an offline canvas using a 2d context and then making a webgl texture of it. This is easy as the texture2d() function also can use a canvas as parameter. Of course, once we have a texture of the text we can use that texture when drawing our cube.
The program text2d_on_cube.ts creates an offline blue canvas with the text HELLUP using the code
    // create canvas with text
    canvasText = document.createElement('canvas');
    canvasText.width = 1024;
    canvasText.height = 1024;
    ctx = canvasText.getContext('2d');
    ctx.clearRect(0, 0, ctx.canvas.width, ctx.canvas.height);

    ctx.fillStyle = "blue";
    ctx.fillRect(0, 0, ctx.canvas.width, ctx.canvas.height);
    ctx.font = "180px Comic Sans MS";
    ctx.fillStyle = "red";
    let txt = "HELLUP!"
    const textMetrics = ctx.measureText(txt);

    ctx.textAlign = "left";
    ctx.fillText(txt, 10, 160);
    textCubeTexture = createCanvasTexture(canvasText);
This is all it takes to put the text on the canvas. We also called ctx.measureText, but did not use the results. If we want to align the text centered on the canvas or wanted to put multiple lines of text on the canvas we would need this call. It will give us the width and height of a text. An example can be found on this site
When text is represented by bitmaps having glyphs on them of say 32 x32 pixels with grayscale values then the representation of the text gets blurry if not used in the same grid on screen. A way to circumvent this problem of bitmap representations is a method that represents shapes by distance fields. In the next image a peanut shape is represented by distances in a rectangular grid. Negative values are for pixels outside and positive for inside. When drawing the shape we calculate the pixel distance value by bilinear interpolation, in the same way as with normal textures and that value determines the grayscale we will be using. 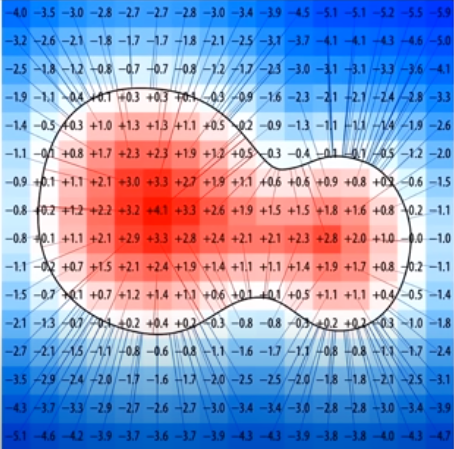
This method can represent characters at magnifications up to 50x with straight lines still being straight lines, but also has some problems left. Sharp corners become rounded. A solution is to use multiple distance fields. A program to create distance fields for fonts is msdfgen.
At the moment we have no program to demonstrate this method. For more see the paper that started all this: Valve paper.
In this section we want to treat a character as a 3D model with vertices. The form of a char is usually given by Bezier curves in true type fonts, in postscript fonts or in openType fonts. We would like to have a program that creates a set of vertices in 2D from such a description with Bezier curves.
In Three.js, a well known open source library, there is a class TextGeometry that can produce 3D fonts. The code const geometry = new THREE.TextGeometry(mytext, {font: font, size: size}) creates a geometry with a vertexBuffer for mytext. The font used is in .json format that can be created with Facetype.js a program that converts a font (or a range of chars of a font) into a typeface.js font. Or we look for typeface.json files using Google.
If we look at the source code of Three.js we do find the essential code in the extras subdirectory. All kinds of curves are defined and in the file extras/core/Font.js we find the function generateShapes: function ( text, size ) that generates for all the chars in text the required paths. In ShapeUtils use is made of Earcut.js to triangulate the contour with the holes in it. Earcut is called as earcut(vertices[, holes, dimensions = 2]), where the holes are at the end of the vertices array. An example with one hole is earcut([0,0, 100,0, 100,100, 0,100, 20,20, 80,20, 80,80, 20,80], [4]); where the hole starts from the 4th vertex and ends at the end of the vertices array. The result is [3,0,4, 5,4,0, 3,4,7, 5,0,1, 2,3,7, 6,5,1, 2,7,6, 6,1,2], 8 triangles with the given indices in vertices.
Before we make our own version to create 2D fonts we will first make an example using earcut.js.
The program ellips2D.ts tests the use of earcut.js. To produce an ellipse we have a new set of classes, all subclasses of Curve2d in the subdirectory geometry, one of them is the ellips. All the curves that are subclasses of Curve2d are parametrized by its natural parameter t: 0 <= t <= 1.0, so after the creation of a curve for every value of t you get an exact coordinate (x,y) of the curve. In many cases we make use of an other parameter u: 0 <= u <= 1.0 to find a point on the curve. This parameter measures the length of the curve, e.g. when using u=0.2 we are at 20% distance of the total curve-length. The function getSpacesPoints(count) makes use of this parameter u and returns count+1 points that divides the curve in count divisions of equal length.
In the program ellipse2D the code that generates the vertices for the ellipse is given by
    let ellipse = new Ellipse(vec2.create(), vec2.fromValues(0.8, 0.6), 0, 1.5 * Math.PI);

    const count = 40;
    let pts: vec2[] = ellipse.getSpacedPoints(count);

    let earPts = new Float32Array(2 * count + 2);
    for (let i = 0; i < count; i++) {
        earPts[2 * i] = pts[i][0]; earPts[2 * i + 1] = pts[i][1];
    }
    earPts[2 * count] = 0;
    earPts[2 * count + 1] = 0;
    indices = new Uint16Array(
        Earcut.triangulate(earPts, null));
    indices.forEach((tri) => { console.log("" + tri + "\n") });

    const row = 6;
    let vertices = new Float32Array(row * (count + 1));
    for (let i = 0; i < count + 1; i++) {
        vertices[i * row] = earPts[2 * i];
        vertices[i * row + 1] = earPts[2 * i + 1];
        vertices[i * row + 2] = 0; //vertices are in XY plane
        vertices[i * row + 3] = 0; // normal z-axis
        vertices[i * row + 4] = 0;
        vertices[i * row + 5] = -1.0;
    }
We approximate the ellipse with 40 points on the ellipse and add the point in the middle of the ellipse (0,0). Then we let earcut do its work to create triangles, giving us the indices. In this example we have no holes, the result will be a filled ellipse. In the code we finally add a z=0 to create 3D points and we add a normal in the z-direction. The result is: 
We first will look at creating some fonts in json format. The source of these fonts will be in TrueType format or another well-known format. There are sites that will select free fonts for us, we will make use of font squirrel, blue vinyl and others. After downloading these fonts in .ttf files we use the site https://gero3.github.io/facetype.js/ to convert these fonts in a .json format. Looking inside these json files we find a text description of our fonts with for the letter B for instance:
"B":{"ha":817,"x_min":0,"x_max":0,"o":"m 125 0 l 415 0 b 761 267 619 0 761 88 b 550 485 761 392 683 464 l 550 490 b 708 689 657 518 708 599 b 396 911 708 849 581 911 l 125 911 z m 240 522 l 240 819 l 381 819 b 594 679 522 819 594 778 b 375 522 594 578 531 522 z m 240 92 l 240 436 l 399 436 b 647 272 558 436 647 385 b 399 92 647 149 556 92 z "}
We want to use this description to produce a VertexObject for "B". After the "o": follows the description of the curves:
m=move to: 125,0
l=line to: 415, 0
b=cubicBezier: 761 267, 619 0, 761 88
b=cubicBezier: 550 485, 761 392, 683 464
l=line to: 550 490
b=cubicBezier: 708 689, 657 518, 708 599
b=cubicBezier: 396 911, 708 849, 581 911
l=line to: 125 911
z=close path
m 240 522
l=line to: 240 819
l=line to: 381 819
b=cubicBezier: 594 679, 522 819, 594 778
b=cubicBezier: 375 522, 594 578, 531 522
z=close path
m 240 92
l=line to: 240 436
l=line to: 399 436
b=cubicBezier: 647 272, 558 436, 647 385
b=cubicBezier: 399 92, 647 149, 556 92
z=close path
The source for this font was probably in postscript format, because the outlines are given in cubic bezier curves, whereas TrueType fonts use quadratic bezier curves. Lines, cubic bezier curves, quadratic bezier curves are all subclass of Curve2d and points on the curves can again be produced with getSpacedPoints(count). The letter "B" consists of three parts, one for the outside and two for the two holes in the B. In the same way as was done in the ellipse program, we make again use of Earcut.js to do the tirangulation.
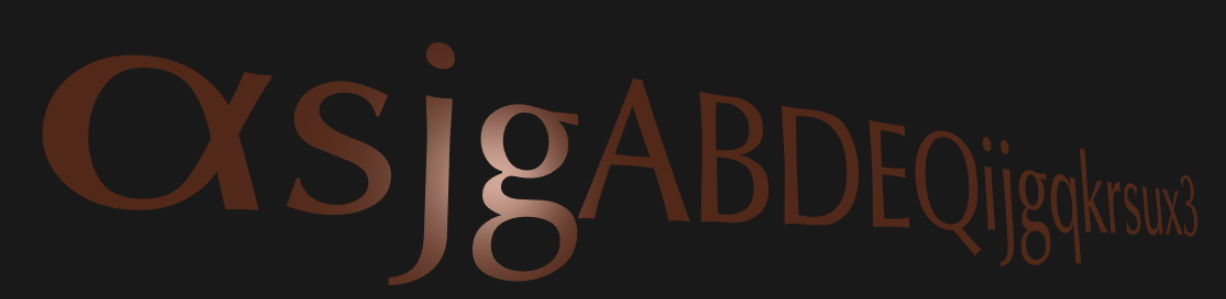
The code that helps us creating a VertexObject is in /geometry/Glyph.ts. The steps we make are first, parse the json file of the glyphs in the font, then produce the input for Earcut and finally use the result of earcut to create a VertxObject. In our program font3D.ts we test the vertexObjects of a font a little looking at the visual output of an input string let name = "AsjgABDEQijgqkrsux3"; using the code:
    for (let i = 0, il = name.length; i < il; i++) {

        let c = name.charAt(i);
        let jsonGlyph = jsonFont.glyphs[c];
        if (!jsonGlyph) { startTranslation += fontResolution; continue; }
        let glyph: Glyph = new Glyph(jsonGlyph, true);

        for (let j = 0; j < glyph.ids; j++) {
            glyphTranslations.push(startTranslation);

            let vo = glyph.createVertexObject(j);
            glyphObjects.push(vo);

            let glyphVAO = gl.createVertexArray()
            glyphVAOS.push(glyphVAO);
            ...(create the OpenGL VertexArrayObject)
        }
        startTranslation += glyph.horizAdv;
For every character in the name a glyph is made with new Glyph(jsonGlyph, true);. The true value indicates that the input font is TrueType (for postscript use false). A glyph can produce one or more sub-glyphs as indicated by glyph.ids. For instance the letter "i" produces two VertexObjects, one for the stem and another for the dot above it. The values of fontResolution of the font is read from the json file as is the horizontal advance of every char. They are used to position the chars on screen.
The following fonts have been tested visually and seemd to be all right:
/fonts/Three/optimer_regular.typeface.json
/fonts/stix2-otf/STIX Two Text_Regular.json // ttf=false
/fonts/stix2-otf/STIX Two Math_Regular.json // op math name test; ttf=false
/fonts/baskervillef/BaskervilleF_Regular.json // ttf=false
/fonts/Three/gentilis_regular.typeface.json //
/fonts/Three/helvetiker_regular.typeface.json //
/fonts/SourceSansPro/Source Sans Pro Black_Regular.json //...
/fonts/SourceSansPro/Source Sans Pro Light_Regular.json
/fonts/AlexBrush/Alex Brush_Regular.json
/fonts/LearningCurve/Learning Curve_Regular.json // better than _ps version (capital A)
/fonts/LearningCurve/Learning Curve_Regular_ps.json // ttf=false
/fonts/TurnTable/Turn Table_Regular.json // OK
/fonts/Synthetique/Synthetique_Regular.json // OK
There is still a problem with the letter "g" of Source Sans Pro Black_Regular. In that font also the "q" gave a problem. The other fonts seemed fine. One of the results:
When a new Glyph is created the json gets parsed. The results are a curveList = [], with all found curve2d's and a equally long divisionList with for every curve how many divisions will be used for the corresponding curve in the curveList. Every time the parser finds a 'm' in the json a Move is added to the curveList and a -1 to the divisionList. A Move is not a real curve. It contains the value of clockwise that tells us if the following curves form a clockwise or counter clockwise contour.
The parser uses the left-most point on a contour to find the value of clockwise. In fact any extreme point on the contour culd be used. In that point the cross-product of the vectors going in and going out determines the value of clockwise (see class Orientation).
The user of a glyph calls the method createVertexObject(id). We assume that one clockwise together with 0..N counter clockwise contours form a group. We found no document that tells us about the precise structure of the json font. If + stands for clockwise and - for counter clockwise we assume the structure can consist of one or more groups that can be represented as (+ (-)N)M or ((-)N +)M, where N, M are 0, 1, .. n times. So there are two kinds of groups, starting with a clockwise and ending with a clockwise contour and the assumption is that all groups in a glyph are of the same type. The reading of a group is done with:
// read group
iStartGroup = i;
if (startClockwise) {
    if (!(<Move>cL[moveIndices[i]]).clockwise)
        throw (new Error("error inside font; start positive"));
    i++;
    while (i < il && (!(<Move>cL[moveIndices[i]]).clockwise)) i++;
}
else {
    while (i < il && (!(<Move>cL[moveIndices[i]]).clockwise)) i++;
    if (i == il)
        throw (new Error("error inside font; only counter clockwise"));
    if (i < il && (!(<Move>cL[moveIndices[i]]).clockwise))
        throw (new Error("error inside font; end positive"));
    i++;
}
iEndGroup = i;
If only counter clockwise groups are found then the reason is probably that a wrong value of ttf in the constructor of Glyph is used: TrueType and postscript use opposite meanings for the clockwise value (fontforge).