 .
.In this section the directory structure we will use is described. As already mentioned we use typescript to produce our javascript. We will need a fixed place for the math library and a place where we put the products we make. After all files are made we deploy the application to a webserver.
We also install the tsc typescipt compiler and create an application that opens an empty canvas on a html-file.
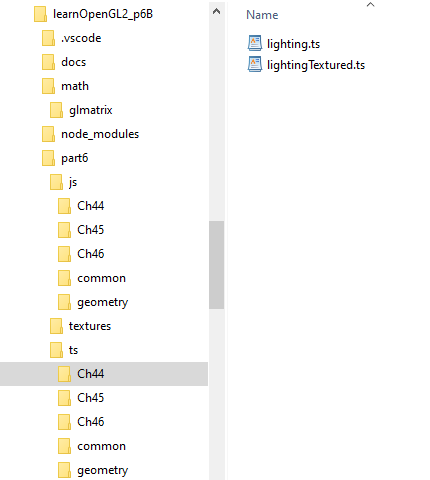
In the image the project structure for Part6 of the book is shown.
.
Part6 has three chapters 44, 45 and 46. In the open typescript directory ts/Ch44 there are two typescript files that translate two C++ programs from LearnOpenGL. The two filles are 'transpiled' to javascript code and placed in the directory js/Ch44. There are two more subdirectories of ts, ts/common and ts/geometry. These two subdirectories also have code that is produced by ourselves and the javascript translations are in the subdirectories js/common and js/geometry. The code that is in the math and node_modules directories contains code from others. The other directories are textures (with images that are loaded in the programs), docs (with documentation on programs) and .vscode (with settings of the VS Code program).
The subdirectories of js contain more code than the transpiled typescript code. In those directories are also the shaders written in GLSL and the html startup files that will call our javascript code.
Mirroring the typescript structure and the javascript structure gives us the advantage that references to the other directories will be the same. To make things even more simple we will not use a deployment step. Using the directory learnOpenGl_p6B as the root directory of our Servez server we can test the result without it.
We use typescript for creating javascript. First install Node.js and then use the npm package manager to install the typescript transpiler/compiler with following command in the terminal window: npm install -g typescript. This command installes the transpiler globally (-g option) and after this it is available in all your projects. Check the version with the command tsc --version in the terminal window.
With the compiler (transpiler is better, it translates from one high level language to another) installed, we create a folder with the name 'LearnOpenGL_p1B' in the filemanager. Then we open that folder in VS Code using File | Open Folder.... In the Terminal window we give the command tsc --init. This command creates the file 'tsconfig.json' with default settings for CompilerOptions. In this file other options can be given and the contents of the config file we will use in Part6 are as follows:
{
  "compilerOptions": {
    /* Basic Options */
    "target": "ES6",
    "module": "ES2015",
    "declaration": true,             /* Generates corresponding '.d.ts' file. */
    "sourceMap": true,               /* Generates corresponding '.map' file. */
    "outDir": "./part6/js",          /* Redirect output structure to the directory. */
    "rootDir": "./part6/ts",         /* Specify the root directory of input files. */
    "removeComments": true,          /* Do not emit comments to output. */

    /* Strict Type-Checking Options */
    "strict": true,                  /* Enable all strict type-checking options. */

    /* Module Resolution Options */
     "baseUrl": ".",
     "paths": {
      "*": ["."] },
    "esModuleInterop": true,

    /* Source Map Options */

    /* Experimental Options */
  },

  //"exclude": ["./js/**/*"],

  "files": [
    //common files:
    // "./part6/ts/common/Camera.ts",
    // "./part6/ts/common/KeyInput.ts",
    // "./part6/ts/common/Mouse.ts",
    // "./part6/ts/common/Shader.ts",
    // "./part6/ts/geometry/Geometry.ts",

    //chapter files:
    "./part6/ts/Ch44/lighting.ts",
    "./part6/ts/Ch44/lightingTextured.ts",
  ]
}
In the compilerOptions section it is important to notice that it says: "outDir": "./part6/js" and "rootDir": "./part6/ts". These two settings have the effect that the typescript files in the part6/ts subdirectory are translated to javascript files in the part6/js subdirectory.
There is also a 'files' section in the config file. This section will be used to tell the compiler which files must be translated to javascript. Here it says that 'lighting.ts' and 'lightingTextured.ts' must be compiled.
In the C++ code of LearnOpenGL we create windows in which the OpenGL drawing is presented. They use the GLFW library for opening a window. The same library also handles the resizing of windows and keyboard input. The programs we will write are executed in a browser and the window is a canvas, a standard element of html. Later on in our project we will draw on the canvas using OpenGL.
Now we follow the next steps to create the canvas. We create the directory structure as above, but now for 'part1' and a tsconfig file as above and again now for 'part1.
<html><head></head>
<body>
<div>A canvas program</div>
</body>
<script type="module" src="./canvas.js"></script>
</html>
Before creating the canvas.js file, we use the Servez server and in the field 'Folder to serve' we type 'LearnOpenGL_p1B'. The port will be the default '8080'. After this we look at our site in the Chrome browser by typing the address 'localhost:8080'.
In VS Code we create a 'launch.json' file by first clicking the Debug-icon in the left menu bar and clicking in the textbox next to the green Debug button. We choose the use Chrome option and the result in the launch file contains:
    "configurations": [
        {
            "type": "chrome",
            "request": "launch",
            "name": "Launch Chrome against localhost",
            "url": "http://localhost:8080",
            "webRoot": "${workspaceFolder}"
        }
    ]
Next we press the green button and we see that Chrome is launched at the address 'http://localhost:8080'.
// creating window (canvas) and rendering context (gl)
let canvas = document.createElement('canvas');
canvas.width = window.innerWidth;
canvas.height = window.innerHeight;
document.body.appendChild(canvas);
This is used as the equivalent of creating a window in C++. This file is pure javascript, no typing information is added. But we are in no way forced to add type information, and so this is a typescript file as well.
We copy the 'tsconfig.json' contents to the 'tsconfig.json' in the root-directory and adapt it to the current project: we change 'part6' into 'part1' and set the 'files' that must be transpiled to './part1/ts/Ch0/canvas.ts'.
We add to the rootdirectory a batch file 'transpile.bat' with the following content
tsc --build --traceResolution tsconfig.jsonThe tsc (type-script-compiler) uses the settings in our 'tsconfig.json' file. In the terminal window we call the batch command: 'transpile', and the translation to javascript starts. The 'canvas.js' file is now in the '/part1/js/Ch0/' directory.